28.3.10

Hair shoot

I had a shoot last week which was a hair shoot and that was some kind of shoot I like to do. It was a collaboration between the hairdresser, MUA, fashion designer and me, photographer of course. The selected photos will be used to apply in to a hair competition. Talking about hair and beauty shoot, although it not always a must to shoot inside studio but it's necessary to do that in studio so we can easily control the light to make things pop out as the way we want. So I've emailed to Julian to ask him for CIT studio using and lucky me, he agreed to let us access to CIT studio for the shoot.

And I need to say that, CIT studio equipments are amazingly good. Most of them are Broncolor and that's the best brand for lighting stuff in the world professional industry. So having chance playing around with them were really cool for me especially when I'm still in first year in CIT and CIT studios are priority uses for third year only.

Before the shoot, I haven't planned anything for the lighting setup and I didn't even have any reference setup as well. But when entering a large white space in the studio, I decided to have a very clean lighting focus on the hair from the top, with too black card on both side to block reflected light from around. I also came up with 2 heads on the wall but I decided to turn them off so it was mainly one Broncolor head shoot thru large square softbox on boom from above. After a few shots, I added a Broncolor ring flash on my lens to have a little fill directly to the shadow on model's face and the ring flash did a great job. Then I put one strip box behind model to add some rim lights.
You can see the setup here:

And here is the behind the scene photo with the model is Benita and the MUA that I haven't got her name.


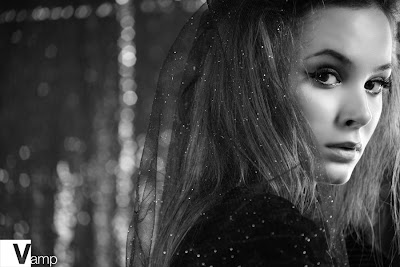
And here are some final photos:

 Model: Benita, Mick
Hair: Priya
Wardrobe: Anna
MUA: ?

The models were actually not professional models, they were only model for hair but the competition requires 1 more look of half/full body of every model so we need to came up with half body shots. And I think both Benita and Mick did great jobs posing in front of camera that way. Bravo guys!!!

25.3.10

Rachelle Wood - Model shoot

This photo shoot with Rachelle was on the day right after the shoot with Simone Luker. Rachelle is a very lovely model and very enthusiastic as well. She's a mix of half Australian and half Filipino, that's why she has a very oriental look.
We came to a tunnel passage to get some closeup shots first as planned.  She did the make-up herself.

I really like how Rachelle give me some variation emotions for these head shots. Look really lovely.
I used a simple lighting setup for these shot, one light shoot thru square softbox on her right and one naked kicker flash behind her head. You can view an example here:
(Simone, my girlfriend's little sister, did a great job for holding the light again)

Another shot for this setup, this time I let some flare came into my lens:


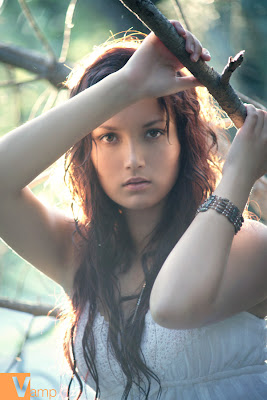
After a few shots at the tunnel, we walked a little further to the riverside to take some shots with the trees. This time I had Rachelle did her hair wet to give me a very natural look. And I think that look was totally match to her:
The key light for 2 photos above was only use by ambient lighting.

Then when the day almost ended, we tried our luck to do some more shot with the sun as back lighting. This time I turn off all my flashes.
And the last photo is really my fave one. I love how natural she was and the way she blended into the environment. I just realized that I like to do this style some more times, so now I'm looking for models who are perfect match to nature like Rachelle.

24.3.10

Skyfire Mar 20, Canberra

It was on the Harmony Day I think. And the sky fire was so spectacular, it was the first time I saw some firework in heart shapes and even in cubic shapes. But unfortunately I couldn't captured any of that shape just because the shutter speed was slow, around 5 seconds and above.

22.3.10

Simone Luker - Model shoot

I had another wonderful shoot with Simone Luker on last weekend. We met up at the Garema place in Civic and walked around for some location spots. This time I use a lot of ambient lighting as main light.


These last photos at the bridge I used one SB-600 putting behind Simone for back lighting. I chose the angle to have Simone cover the flash behind her but in some photos I need to do clone stamp with the light stand.

Next: Photoshoot with Rachelle Wood

16.3.10

Melissa Tan - Model shoot

I had a photoshoot on last Saturday with Melissa Tan and that was a great shoot to both of us. It could be considered as a model test. Melissa Tan is a fantastic model, she did a great job on posing, very inspiration. She came from Malaysia and studying in Canberra now and she has worked in the professional industry before. I was happy to shoot with her.
The shoot, actually was involved by the model and me. There was my girlfriend's little sister came over to assist with the light for a while but most of the time was only 2 of us. To be honestly, this is my very first model shoot in Canberra, that means almost 2 month since I left Vietnam. It can explain why did I feel so excited.
The location was mainly in the back alley near the bus interchange in Civic. We played around with some doors, stair steps and even a truck. Most of the time I use 2 lights, they are Canon 580EX (with honeycomb grid) and Nikon SB28. And when the sun went lower, I had some chance to let the sun light behind Melissa as a back light. Then the final shot I use the sun light directly on her as key light. Let's check them out


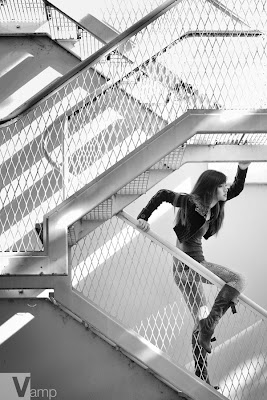
There was a lovely stair that I could came up with this very nice composition.


This shot, her hair wasn't lit by the flash I put in the alley but was lit by the sun light.


In this shot I used the sun light as key light. 


7.3.10

My Gear

I haven't talked a lot about my equipments before. I can say that I'm no "gear freak" and I always try to play around with things already with me. Let's have a loot at my backpack to see what I've got here:

  
The photo was taken with my iPhone at night with my desk light so quality looks bad.
Ok, let me tell you what are those things you looking at:
Camera body: Sony A900, attached with my favorite lens: Carl Zeiss 24-70mm/f2.8
I've got this camera in June 2009 and I've been happy with this camera. Image stabilize built-in body give me a lot of advantage to shoot in 1/30s ~ 1/60s. But I think Sony must improve their Noise Control function, I hate to shoot above ISO 400 because noise starts to affect to the image a lot at ISO 400 and above.
The CZ 24-70mm lens is one of the most super sharp zoom lens for DSLR and I love to use this range a lot. Compare with Canon 24-70mm/f2.8 (which I've used before with my Canon 40D), CZ lens will win in every range even in the focal length 70mm , wide open, the image quality still very good (I used to avoid to shoot at 70mm/f2.8 on my Canon lens because it cause the image looks so soft).
The other lens on the left side is Minolta "Beercan" 70-210mm/f4. This is one of Minolta's "legend lens". Although it has been produced 30 years ago but the quality is still amazing. 
On the right side and in the middle are my 3 flashes which I've used a lot for on-location shoot. I've started to play with 'strobist' 1 year ago (many thanks to www.strobist.com) and now I can say that I'm proud with how to balance ambient light and flash light to create some stunning photos.
They are: Canon 580EX (I keep this flash from my Canon equipments because I don't use any Sony flash on-camera), Nikon SB26 (a gift from Liebehuman) and Nikon SB600 (a gift from )
The rest are some of my flash wireless remote. And, that's all.

I didn't own any studio in Vietnam. When I need to shoot for commercial in studio, I've rented.

Shooting at fitness center

One of my favorite jobs, I've always wanted to shoot some gymnastic photos inside fitness center. I like to focus on their facial expressions and all of the efforts. Then I've got one job from the magazine I've done many fashion editorials for them. This time they asked me to shoot an commercial fashion editorial inside a fitness center with a model in sport outfit.
Unfortunately, the client needed the photos should focus on the outfit only, no need for much facial expression and, the model, despite a perfect figure body, she could only do cold face, that is very suitable for fashion shoot but not for this shoot.
Anyway, everything was set from the client and I was happy with the location they've chosen, California WOW, the best fitness center in Vietnam (as I've known).
So it's about time for the shoot. As usual, I use my small flashes for on-location shoots, this time I've used 2 flashed, 1 Canon 580EX shoot thru translucent umbrella for key light and 1 'nude' Nikon SB26 for back light, all wireless triggered.
Except the shot with the bikes, most of the rest I shot about 1 stop underexposed for the ambient so that I can focus the light on the model to make her pop out from the background.

Here are those shots:


Model: Thái Hà
Outfit: Sloggy Sporty
Location: WOW California


I was quite happy with them though. These shot was published on December 2009.

3.3.10

Before / After 3

Model: Margo Yalkovskaya
MUA: Linh Doan
Stylist: Chu Sen

From what I've said in the last entry (http://lamtrancit.blogspot.com/2010/02/before-after-2.html), I keep my words and make another short tutorial here with more information for the "3 steps": Dust and Scratch, Gaussian Blur and Add Noise.

This is the original image from a shoot for Margo Yalkovskaya and model Kaleriya.


The images size is quite large (it was created from my Sony A900 body). Why should you care about the image size? Because depend on how large the area skin you want to fix, you might use the filter more variable.
 

Duplicate your Background Layer to have Layer 1 (shortcut: Command J or Ctrl J on Windows)

Use Patch Tool or Healing Brush or Healing Brush Tool or Clone Stamp Tool to fix some major spots on her face.
You will have some results look like this


Next, duplicate to new layer, the new layer will be automatically named Layer 1 Copy
Then you begin to make new skin tone for her.

Use Dust And Scratch filter to have a window look like this:
 
You can choose a suitable number for the Radius. In the picture above, I choose 50 pixels because I have a skin area need to work with. You can adjust the Radius by dragging the arrow then check / uncheck to Preview box to see the result.
Hit OK to apply the filter.


Next, use the Gaussian Blur filter:

Again, find a suitable number for Radius. This step will help to soften area between shadow and highlight.
Hit Ok.


And next, Add Noise filter, you can skip this step if you like to have her face look smoother and softer. But I suggest you should do this step to add some little texture on her skin
 

If you're not sure how much noise you need to add, see the picture above as an example.
After that, apply Gaussian Blur filter one more time to soften those noise. See the picture below:


Remember that all these filter steps was applied on the same layer (that would be Layer 1 Copy)
Add a layer mask on the Layer 1 Copy and fill Black color on the photo when you select at the layer mask. So now you hide everything that was display earlier on the Layer 1 Copy. (You can also hold Alt when click to the button Add Layer Mask so that no need to fill the black color)
 

And now, use the Brush Tool, choose Soft Round Brush (brush's opacity at 10%) to paint white color into the area on her face that you want to get them soften. Avoid to paint on the areas that you want to keep the detail (i.e: eye, noise, lip, hair ...). If you think you overdo and the skin look so soft, you can change brush's color to Black and it will have the reverse effect.
So let's make it simple:
- Paint White will reveal the effect that you've done on Layer 1 Copy
- Paint Black will hide the effect away.
You can look at the picture below as a reference to see how much you need to keep the effect:

Finish the paint job, you will have the result like this:


Now you can duplicate Layer 1 to have Layer 1 Copy 2, then merge both Layer 1 Copy and Layer 1 Copy 2 to 1 layer. You can do this or skip it, really doesn't matter.
Now the photo will look like this:


Now apply some more additional steps to make the photos look better for example, use Clone Stamp Tool to fix the area on her forehead and her cheeks
You will have result like this:


Now you can do the step with Burn Tool and Dodge Tool as I've introduce in the last entry and adjust the Level or Curve to have the final result like this (totally up to you lol):

And yes, we have just finished! Congratulations! Yay!!!! 

Phew, so many steps for me to create this tutorial. I could say that this is the first time I do some thing like this hahaha I hope you don't mind if I made any mistake above. This entry, actually is just a litte sharing from what I've known for photo retouching. It's not a perfect way to do the skin job. You can use some plugin to create a complete new skin tone which could look so fake (but you can fix by using the layer mask). So if you know something that can give a better result or something that you want to correct what I've said above, please feel free to share with me. Thank you.