This shoot was for my assignment at school. We supposed to shoot a single portrait of a model to make it look like a magazine editorial. Most of other classmates try female model and do fashion. But I've done female models already in Group Portrait assignment (post will coming soon) so this time I decided to shoot a male model. And I ask Sam (he's boyfriend of Elizabeth Payne in the Ferrari shoot) to help me out with this assignment. And actually, Sam has been played cricket professional for a while so I decided to use that theme.
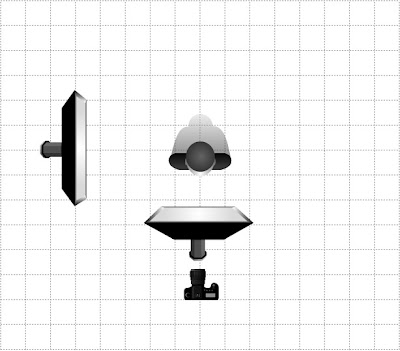
Here is the lighting setup:
Because I wanted to create a better wrap-around-highlight on Sam so I used 1 large square softbox on a boom and put it high above and on axis with the camera. I added 1 stripbox on camera left to add some more harsh rim light on Sam.
Please notice that we're not allowed to use flash for this assignment so all the lighting I used was only from modeling lamps. So basically, I shoot around f/4, ISO 400 and shutter speed 1/60th
And the results are:
For image processing, I only applied a little Burn and Dodge technique on this photo. Remember that the original photo should already have contrast in highlight and shadow to get more efficiency for this technique.
Next entry will be hair shoot for Priya Chandra, hair stylist:
31.5.10
Anne Louise Clare Hackett - Model shoot
Anne is a new starting model who ask me to help her expand her portfolio. I was a bit busy with lots of school assignment at that time but I still managed to take her out for 2 hours shooting. Most of the time in the shoot I use natural lighting:
Anne has lovely eyes and innocent cute face so I asked her not to do so much posing, I want to focus on her emotional look only.
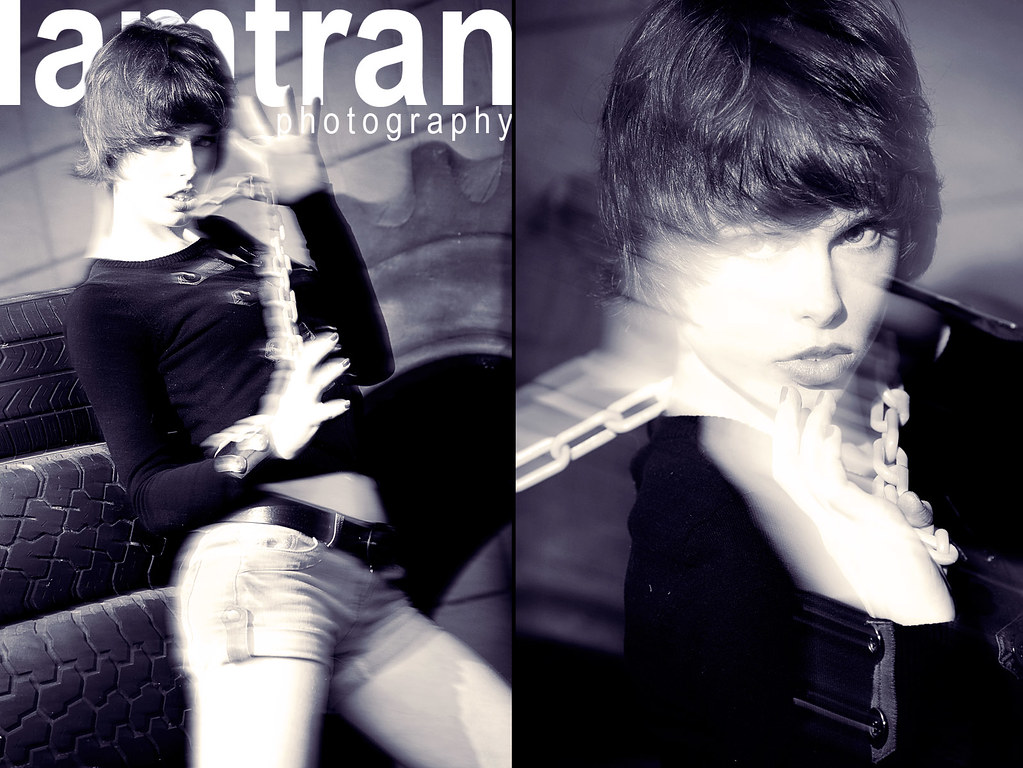
But at the end of the shoot, we found an alley outside a building and there was some giant tires over there could be good for props, then we ended up with this shoo, and I really like it:
In this photo I use 1 flash high above model right and another flash I put on the ground behind the tire.
For the photoshop effect, nothing special, Add Noise, Motion Blur and Overlay (you can easily figure it our, right?)
Updated:
Model: Anne Louise Clare Hackett
Makeup artist: Judy Stone
8.5.10
Emotional Dusk Lighting
Ok, I just want to share with you guys some small tips to create a very emotional 'dusk lighting' as I used in the shoot with Elizabeth Payne (View post here)
The point is, you should choose to use the ambient light very carefully and to do this, you need to get some lucks then, because not everyday could be a beautiful sunny day. So the first thing to do, you should do the shoot around 3:30pm to 5pm and it depends on the weather (it's Fall in Australia now so the sun come down very fast, different with summer, we still have sun light at 8pm).
The second thing is, adjust your White Balance setting into 5500K. If you use Auto White Balance to shoot when sunset, your camera will automatically adjust the color temperature into lower than 5000K to make your photo look 'cooler' against the 'warm' color temperature of the environment.
Then, use Color Balance in your Photoshop to adjust the color a bit (Image -> Adjustments -> Color Balance) with some setting like this:
You can see that it just slightly shift the color tone a bit to more yellow and red because I don't want to blend the color a lot and I still want to keep the color of the clothes as well.
Then use the final trick to make to photo look warmer: Photo Filter (Image -> Adjustments -> Photo Filter)
You can also want to use Hue / Saturation to give more saturation on Yellow and Red, but it depends on the photo you want to edit.
And that's it, now we can see the result:
Elizabeth Payne - Model shoot
This is a wonderful shoot with the gorgeous model: Elizabeth Payne. This time we had a Ferrari 512TR as props and to have a super car as props like that is so cool. Mark, the Ferrari's owner, also contributed himself as a model in some shots as well.
The first location is by the lake side near Old Parliament House of Canberra, there was a passage lead to the lake, surround by wooden walls. We parked the Ferrari on that passage to have some first shots with Elizabeth bikini:
Main light was a naked 580EX high above model to simulate sun light, 2 other small flashes around the car to create some more rim lights.
Main light bounced into the wall to create soft light on her, two other flashes was put low on the ground.
Then we move to the airport and parked on the upperfloor of a car park. This open space is perfect to have some shots with the sunlight and blue sky. Most of the time I used only ambient light.
The car made a very nice background for a high fashion shoot.
This shot I use the rear car hood as a 'gobo' to let the sun went through. I love Elizabeth's look in this shot.
And that's it. Maybe you want to watch behind the scene video as well:
Credit:
Model: Elizabeth Payne and Mark McEwen
Make-up by Kylie Bersinic
Hair by Priya Chandra
Skirt and dress by Beau & Arrow
Bikini and suits by model's own
Video recorded by Sammy Harrison, edited by me.
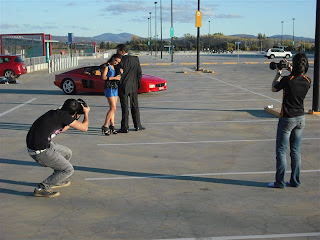
Some behind the scene photos taken by Sam, Elizabeth's boyfriend:
Tag
accessory,
Beau and Arrow,
Elizabeth Payne,
fashion,
ferrari,
flash,
hair,
jewelry,
Kylie Bersinic,
lighting,
make-up,
makeup,
model,
photographer,
photography,
Priya Chandra,
shoes,
stylist,
vamp
Subscribe to:
Comments (Atom)


